Giverny Update

Spent a few more hours on the sea of green. Since the last post, I’ve worked on the back of the landscape, working in more dark tones to get things pushed backwards. But the bulk of time was spent on the large grouping of ferns on the left bank, and the bright pink flowers that are the focal point. Also added some life to the darkest part of the stream and the long grass hanging over it.

Prior to these past two sessions, I spent a little time experimenting with color mixing to get a wide array of greens. Greens are tricky, in my opinion, because there are so many subtle differences, even in the most innocuous of landscapes. It’s also takes some time to control the saturation values properly so the tone of the entire composition is consistent, which seems harder to do with a natural landscape full of green plants.

Next up is the stream, which is really out of whack in the current state, but I don’t think it will take a lot to get it firmed up.

IMG_2863

Lines and Blossoms – Finished!

Overdue for this post, given that I finished this one a few weeks past, but better late than never. The final “touches” took more time than I thought, but it was important to get the depth of the tree right, which took some long steps out of my comfort zone with a very high value white to represent the bursting blossoms in bloom. It was a bright day, so the photo looked washed out and a little flat, so I went with my gut on what would work on the pseudo shady side (left side). Probably could have gone a little darker to add the right value contrasts, but at some point you have to say “done”!

In addition to the density and value range updates for the cherry blossom, I added more focus to the windows directly above the main doorway. Notice the curtains in their various states of being drawn up or back.

Having taken time to consider the finished painting for the past month, I’m happy with the technical variation and palette. However, as a composition I think it’s lacking. I tried to draw the viewer into the painting in a few ways: 1) the shape of the tree on left side curled around the entrance to the 2) main doorway with the stairs leading light steps up into the darkness, and 3) with more crisp details in the windows immediately around the top of the tree. There’s also some good compositional layout with the various angles of the building lines. That said, I don’t feel that the painting does enough to engage the viewer. I’d be interested to know what others think, so please offer up your criticisms, comments, guidance.

IMG_2843

San Francisco and Golden Gate Diptych

Long overdue for a post. Been working a lot on drawings (animals), finishing the Lines & Blossoms piece, and started this new diptych.

Reference photo was taken by me a couple years ago. It’s an amazing vantage point from the Marin headlands looking back towards the city. Breathtaking!

SF and Golden Gate reference photo

This is my first true diptych, as well as my first painting on wood. The panels are small (5″x7″) and pre-treated. Below is the rough drawing outline, which I had practiced in my sketch book a couple times prior. What worked best for me, which wasn’t the way I first tried to do it, was to draw from the horizon/back of the composition “forward” to the bridge and foreground. It was much, much easier to get the angle and proportion of the GG bridge with the city roughed into the background for reference points.

rough drawing to get scale on panels

This first session was short by my standards, perhaps a couple of hours. It moved quickly because of the small size and the color mixes came together faster than usual. The details will come in the next session, but I think getting the lighting on the cityscape is going to be tricky but critical to ensure the piece has the right depth.

IMG_2813

Lines & Blossoms – Update

This continues to be a rewarding effort, despite the learning curve. Updates from last post include adding details to the tree blossoms, tree trunk texture, improvements to the door to the right of the tree, and some small line detailing in the buildings.

IMG_2806

Still need to figure out how to get the cherry blossoms to look more realistic, while figuring out how to transition the values in the tree to give it a sense of volume. While I love the colors thus far, the result is still flat and lacking depth. It’ll get there, but I haven’t figured out how just yet.

Lines & Blossoms – Impasto Strikes!

Spent a couple of sessions working through the latest challenges with this fun, albeit difficult composition.

Since the last update, a number of things have been tackled, some more than once.

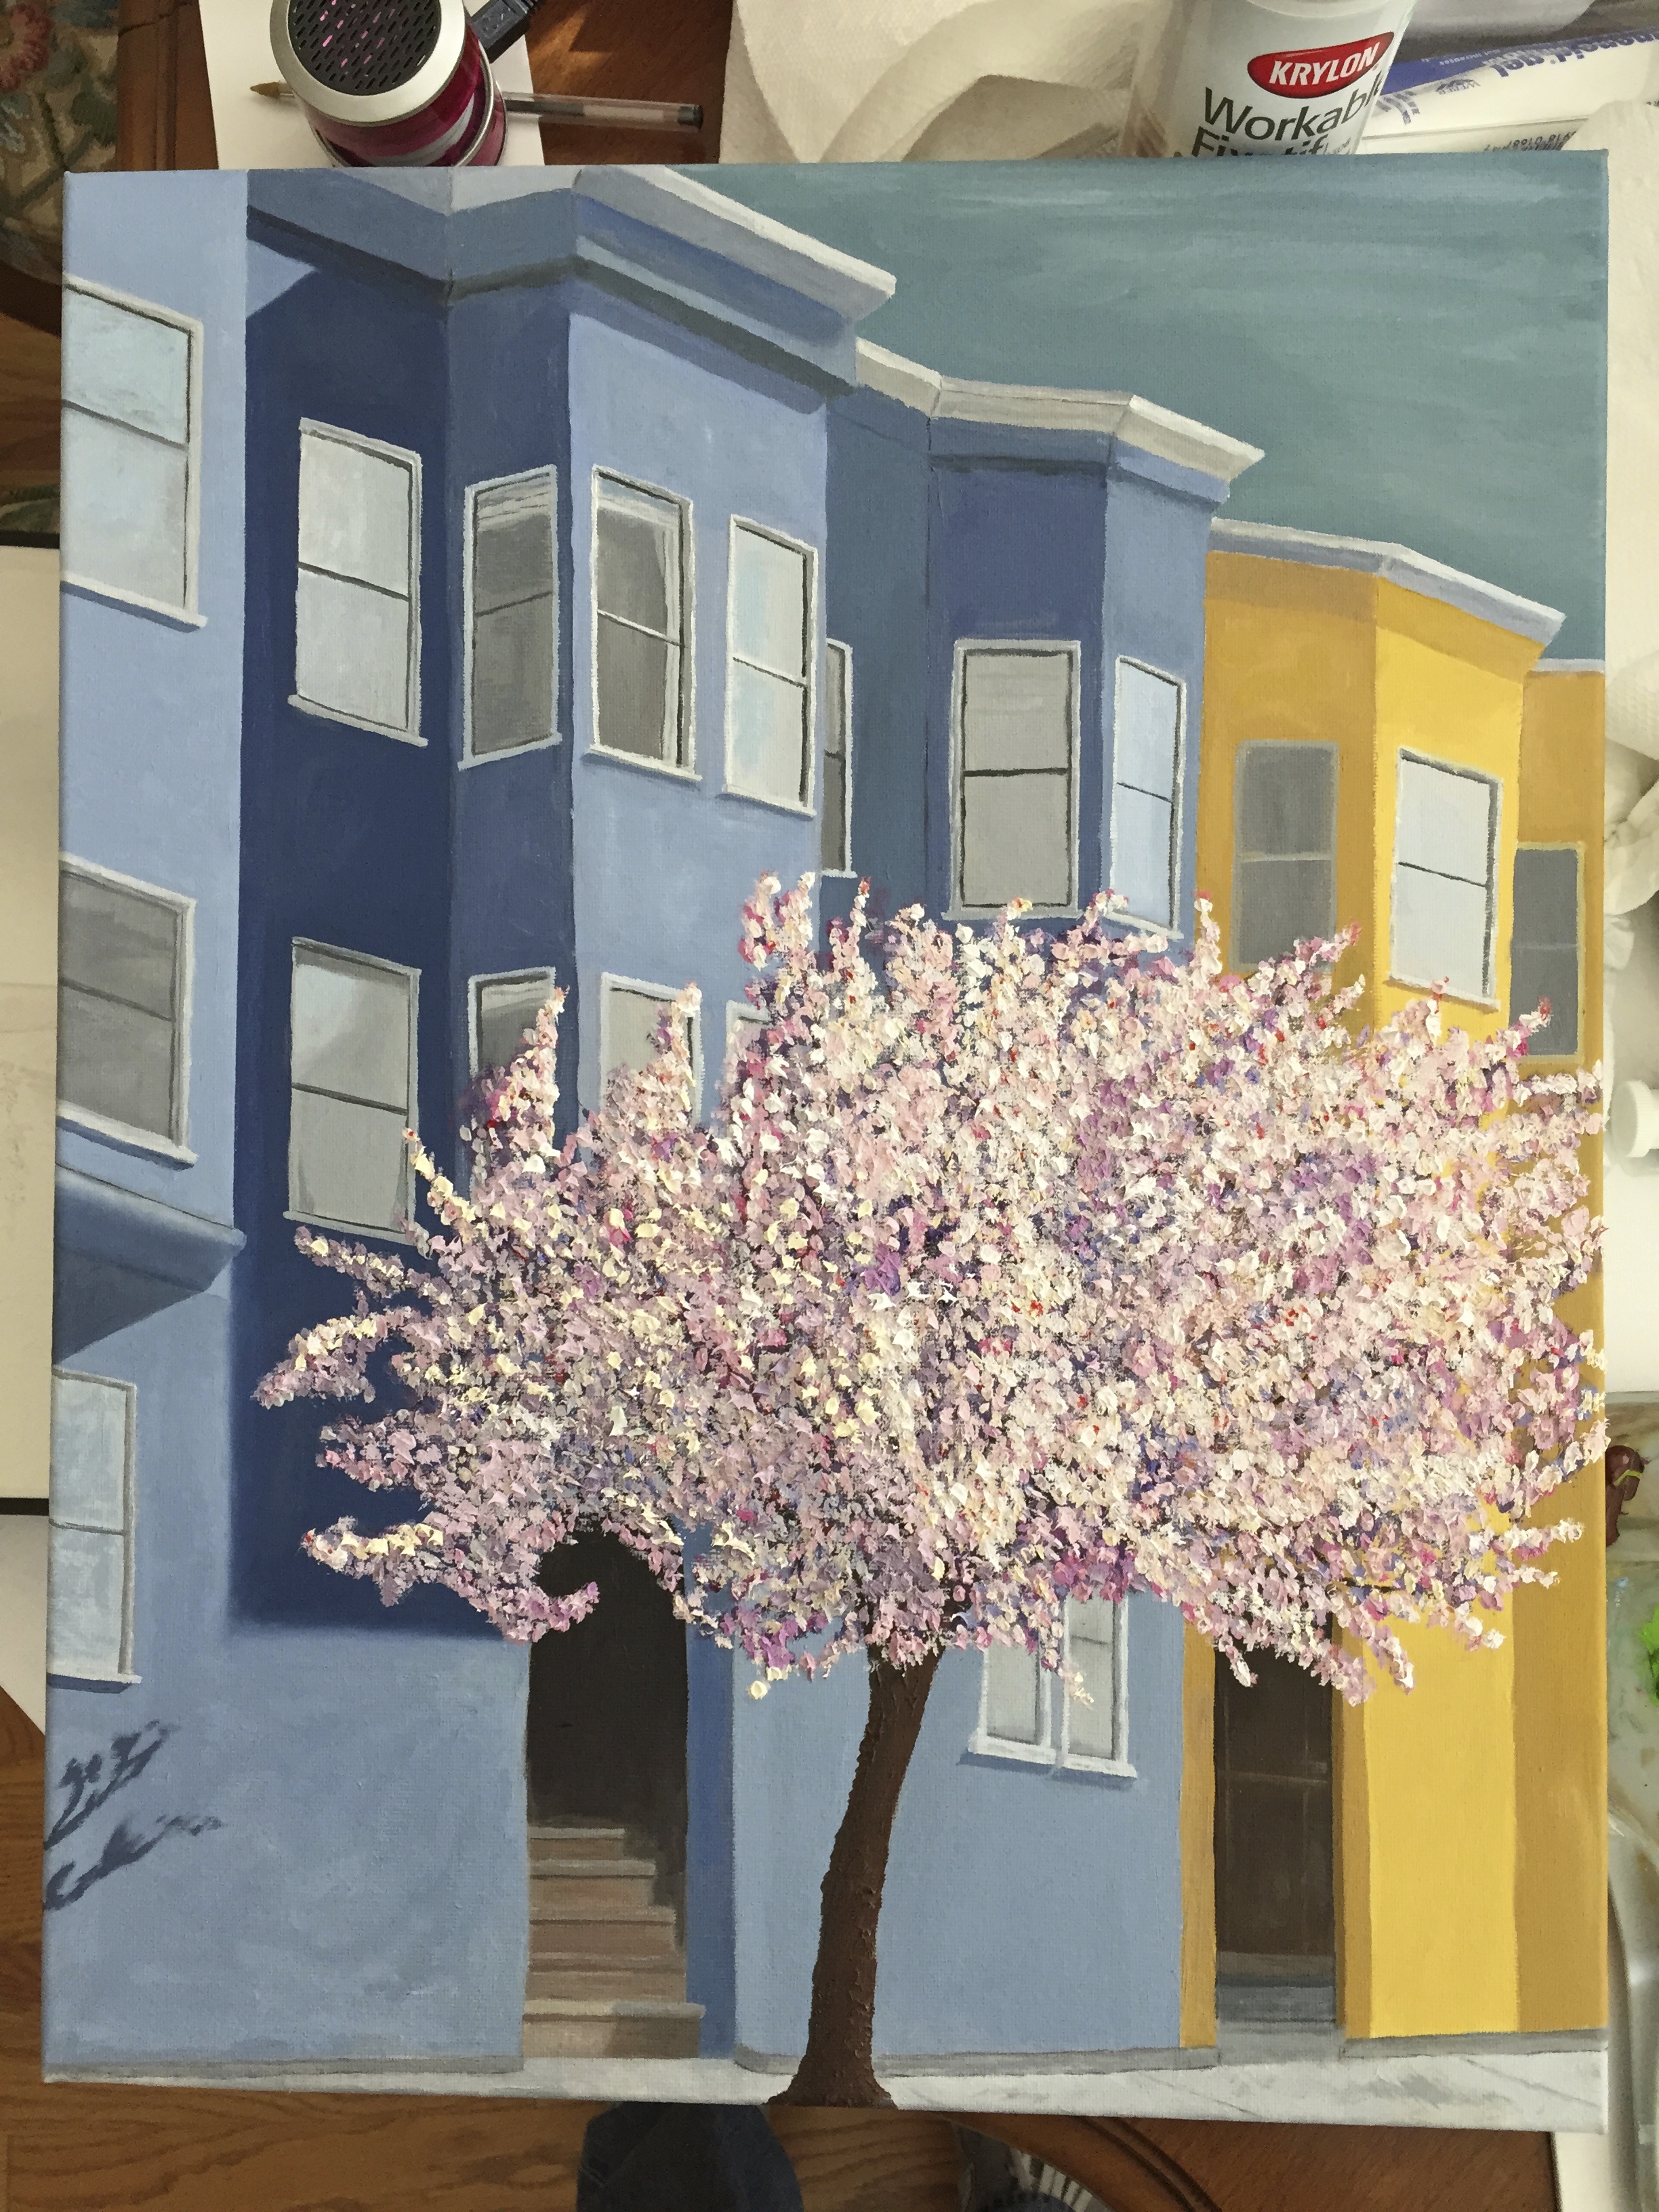
First, the focus remained on the buildings and supporting cast of what will be the cherry blossom tree. This set of sessions updated a number of touchup items, but the primary focus was a) laying in the window woodwork, and b) getting the base layer of the tree on the canvas. It turns out I don’t have a great brush for the type of detail work on the window frames, but I made do with what was available. Adding narrow detail brush to my supply list, but anyone with specific brand/type suggestions is welcome to make comments with the details.

IMG_2799

Next session worked on elements of the composition and the next stage of the tree, including some experimentation with impasto effects.

The most significant update aside from the tree was the addition of a sidewalk (thank you Nina), which added missing structure to the bottom of the work, and gave more strength to the 3-point perspective I was working towards. It’s also going to be a critical part of the composition because it plays an important part in leading the viewer into the painting, whereby there is a clear break in the curb of the sidewalk that leads one into the stairway of the main doorway. The framing of the cherry blossom will enhance this effect.

The impasto on the tree are hard to see in the photo, but believe me they’re there. I dove into my first true impasto medium experience, mixing conservative amounts into the purples and pinks. Its very addictive, especially after having spent hours working on very exacting lines and angles of the homes, then being able to run wild with an array of brushes and styles in exploring how best to represent the beauty of the tree blossoms.

Some other minor updates were made in this session, but things are close to completion. Still need to work a significant layer on the cherry blossom, ensuring there is the right balance of light pinks and whites on the right side of the tree, whereas the values on the left are in shadow and more subdued and less saturated. Furthermore, the black door down the street needs work, as well as some updates to the window panes and their reflections of the sky on this particularly sunny day.

IMG_0165

Roses – Done, but…

IMG_1399.JPG

Finally pushed through a long session today and got this one done. I’m sure there are a few highlights to do and small tweaks when I look at it tomorrow, but happy with the final work. I’m sure I’ll look back on this in the future and laugh at the quality, but for today, it’s a good start.

Since the last session, the roses were touched up (yes, again), leaves were finished, stems done, and the ever intimidating glass vase wrestled to the painterly mat.

Woohoo! Time for wine.

Palette for Arches

No new painting updates today – been a busy week at work, so no play time in the studio. But in the spirit of blogging discipline I wanted to post.

To the untrained eye, this post could look like, well… vomit. But it’s actually the painful reality of painting variations of sand hues. Gotta love that ochre and gray mashup!

The base mix for the arch yellow/sand was ochre, white, a little raw umber, and a spec of cad yellow. The grey is a standard mash of equal parts ultramarine blue and burnt sienna. To move the range of yellow ochre around, I experimented with varying values of the gray mixture. Fun stuff!

Sketching in the arches

I lack the skill to just paint the arches in, especially since I want the large, close ones to have good detail. So I opted to sketch in a few for starters. The ones further away won’t have the same detail, but will carry the burden of contrasting values to showcase the sunlight. Well, that’s the plan at least.

Bull Ring - round 2

Added sky, improved the sand of the bull ring, including texture. FInally, laid in the first layer of benches on the lower level. Also figured out the spacing on the arches. Next weekend this should start looking more appealing.