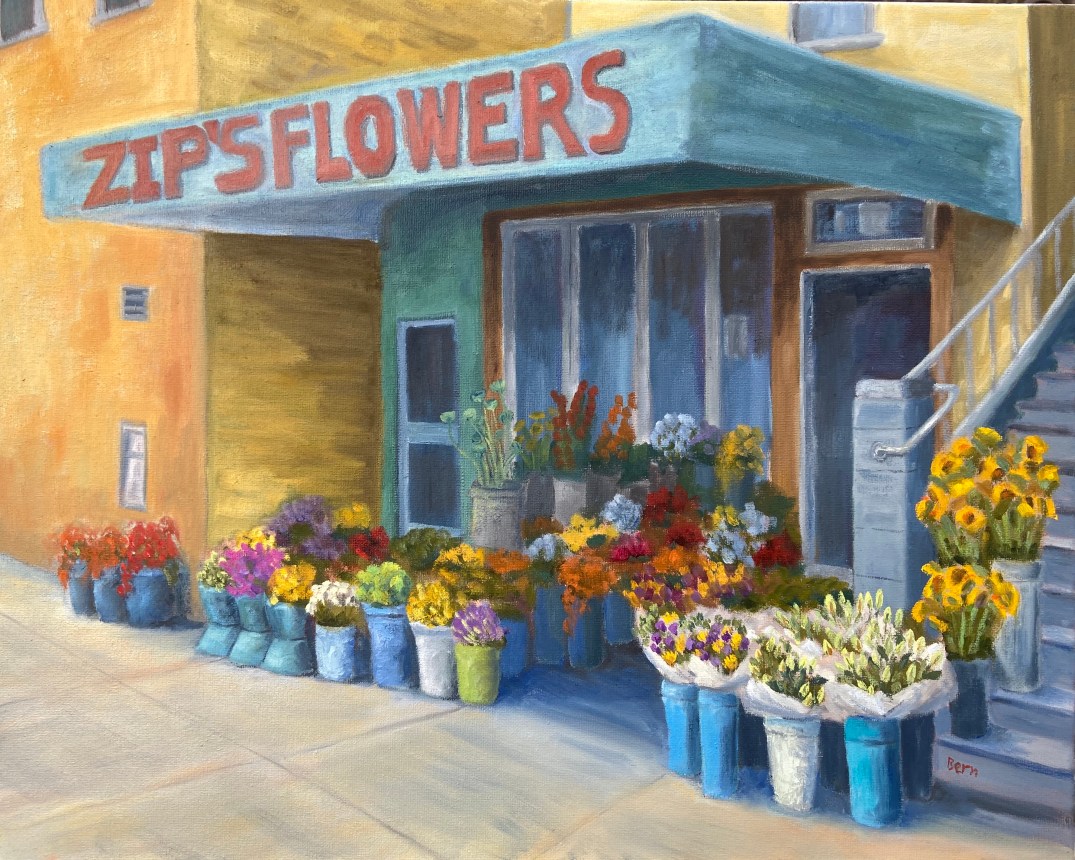
My favorite Austin gallery has included one of my recent pieces in their current group show, Array.
Sunrise Trail ViewArt for the People Gallery – Array Show
Sunrise Trail View (12” x 9”, oil on board) is a plein air piece I did recently in Sedona, Arizona. You can find more about this piece from an earlier blog post here. If you live in Austin, I highly recommend swinging by Art for the People Gallery, as it has a wide range of fun, quality artwork for, well, the people. You can find more information about the current show, Array, at AFTPG web site. If you’re not in Austin, note that all of the pieces (including Sunrise Trail View) are available for viewing / purchase in their online store.
I have a few more pieces that I started plein air in Sedona, so if you like Sunrise Trail View, stay tuned for a couple others in the coming months.
Those of you with nosy dogs might want to call this “hey, whatcha eatin’?” Either way, the nose of a dog is without question one of the most amazing features of any creature on the planet. I’ve read a couple of books that extol the power of the almighty wet nose, which has been helpful in understanding how my furballs perceive and investigate the world around them. It also led my wife and I to play games with our pups that essentially exercise their noses, which turns out is very effective in wearing them out.
The perspective for this composition is from an unusual angle, namely underneath the head, but somehow looking up at the nose. It was a bit of self-inflicted mental torment because I kept pausing the work to make sure this is what a dog’s nose looks like when they go poking it up in the air. Every time I was sure the reference photo was somehow wrong, I would go check out my dog’s nose and sure enough, that’s what it looked like.
As a larger piece, I had some key decisions to make regarding how to render the fur and random hair structure under the mouth. I opted for size 4 and 6 brushes, mostly rounds and flats, to balance the realism of hair while not committing to individual strands throughout. The key with this kind of structure is to ensure disciplined layers that start dark and eventually work light. I also found it useful to do a fair amount of wet-on-wet to get a homogenous look / texture to the hair.
There was a lot of stepping back from this piece to get proper perspective. My plan (always have a plan!) was to view this painting from at least 10 feet, which would allow the observer to really get a sense of the whole snout and see the nose as the focal point. I know this will sound silly, but I kept likening it to an ice cream sundae with a bourbon cherry on top. To draw people to the nose, the texture was critical. This was largely accomplished through a variation of dark mixes, mind you no pure blacks, but warm blues, cool dark reds, and warm yellows to mute the saturation.
Lastly, from a technique perspective, I used a couple of really beat to shit brushes to create that classic dog nose texture. I did some scumbling I suppose, but most of what I was doing didn’t have a painting term – I was basically just smashing and tapping these old brushes loaded with paint all over the nose, creating various transitions in planes and values until it looked right.
Reference PhotoBase LayersHair and Nose ExperimentationNostril Imbalance!Sniffer Final10′ View
I really enjoyed doing this piece and I’m ecstatic that my wife loves it, too. This particular piece is going on our walls once it’s dry, but it will not be the last time I paint a beloved dog sniffer.
Earlier this year, I did a quick study of this composition and instantly loved the bones of the work. Sometimes you get a sense for a painting right away and you just know it’s going to be fun to paint!
The original study can be found in this previous post, Porto Venere (study), which was much smaller, 9 x 12” on paper. It was clear that the key elements to this piece were lighting and linear perspective. The values in the photo are crap (midday, washed out), so it required some improvisation and memory recall from the day I was actually in Porto Venere. I wanted to make sure the sense of the very bright sun was captured in the light and shadow contrasts, but still find a way to make the rooftops surrounding the main tower look interesting and not entirely washed out. To help get an idea of what good looks like, I referenced some works by Kanna Aoki (https://www.kannaaoki.com), who has a great talent for capturing the essence of bright sunny days in San Francisco.
The linear perspective is always a challenge (albeit a fun one) when dealing with cityscapes, but this piece was all about the tower. I took the reference photo from the castle on top of the hill upon which the town is built, so my vantage point was above the tower, but getting the lines right was still very important to convey the size of the building. The trickiest part, however, was the dome. Rather than try and explain the myriad ways it tripped me up, go ahead and try to draw just that part of the building. Too many lines and curves for a mere mortal to tackle.
There was also a wonderful Bob Ross moment as I experimented with the tower. I was mixing some orange color options on my palette and decided to quickly lay down a little paint on the canvas with a palette knife. The intent was to simply dab a little on the canvas, but my hand slipped and spread a big splotch! That happy accident, turns out, gave the impression of old time stucco, or whatever these old buildings are crafted from, and I loved the texture and realistic result. Nowhere else on the composition did I use a palette knife technique, so it helps add complexity to the piece and focus the viewer to the tower.
Last note is the use of reflections of the landscape in the water, which is not in the reference photo. I redid the water numerous times, and each time I used a variation of blue without reflections it dominated the painting and became a distraction. The reflections, I think, give a lot more depth and perspective, which I’m happy with, but one day I’ll have to learn how to do muddled reflections so the water doesn’t look so still.
If you get a chance to go to this part of Italy, stay in Porto Venere and avoid the crushing crowds of the Cinque Terre. Just don’t tell anyone else – it’s a wonderful place because it’s still a bit of a secret.
This one was a challenge for a few reasons. First, this adorable pup is a newly rescued dog one of my good friends adopted recently, so there’s the pressure of getting it right for a multitude of reasons. Secondly, Lyra’s stare is very intense in this portrait, so the need to capture that “what are you looking at?” essence is a new challenge for me. And lastly, Lyra has LOTS OF SPOTS!
Looking through the progression shots in the gallery below, it’s clear that there were a few challenges with the length of her snout. There’s nothing more frustrating than nailing a dog’s nose only to realize that it needs to be erased because you gave the pup a Pinocchio nose. Glad I did opt to erase, though, because it made all the difference in getting her likeness right. In fact, this composition reminded me that I frequently err on the side of Pinocchio noses, so I need to remind myself every time I start a portrait to keep it short!
Back to my friends who adopted Lyra…. she’s a lucky girl to have found such a great home! My friends live in a part of the country that lends itself to great outdoor adventures and plenty of room to run. While there were some lose leash walking and other training challenges early on, Lyra eventually figured out what was expected of her and what seemed like insurmountable issues became distant memories. It never ceases to amaze me how adaptable dogs are to the world, so willing to forgive and live in the now while embracing those who show them love and compassion.
We’re returning to the still life series called Happy Hour. Cocktail #2 is hot off the easel and ready for your guesses. But first, time to reveal the answer to cocktail #1 fromHappy Hour – Angostura… it was a Whiskey Old Fashioned! The Old Fashioned is one of the classic cocktails, but despite the simplicity of it’s composition, there are a number of subtle changes one can make in the base ingredients to create a wide range of variants. A very good recipe can be found here on PUNCH, my go to resource for all things cocktail. If you have a favorite riff on the Old Fashioned, please share in the comments!
Returning to Happy Hour – Roosevelt, the hints are few but specific. I excluded the city name from the napkin, but suffice to say it’s arguably the most important cocktail (and food) city in North America (although I defer to our Canadian readers for any challenges to this claim), birthplace of many classic libations. Any guesses? The answer will be revealed in the next cocktail series piece in a couple weeks.
The Roosevelt is another oil composition on an 8″x6″ gesso board. The type of cocktail glass is not something I would have tackled at this point, as it’s very complex and a bit beyond my comfort zone, but it was true to the cocktail, so I gave it a go. The other challenge was the color of the drink itself, a mix of cadmium red medium, cadmium yellow deep, titanium white and ultramarine blue; there are also some bits with cadmium yellow.
Next time I’ll pay more attention to the dark values in the drink itself, as I strayed from that tenet early on, getting a bit obsessed with trying to nail down the elusive pink/orange color of the drink. If you look at the block-in picture, it’s obvious that I knew there were very dark values in the drink itself, but I didn’t paint them in properly.
And beware the challenge of painting words, especially words with fancy letters… with lots of curves… on an undulating cocktail napkin! Definitely not something to do if you’re jacked up on caffeine – it requires a steady hand and a lot of patience. I had to make a big withdrawal from my limited Bank of Zen to get through it.
I was pleasantly surprised with the ease of doing the blurry, colored bar of illuminated bottles in the background. This is also true to the actual setting of The Roosevelt and a handy approach to call upon in future compositions.
Thanks for visiting and don’t forget to post your critiques and cocktail guesses in the comments!
Framing artwork used to be a dreaded task, but over the years I’ve come to really enjoy it. This is especially true as we start 2020 because I recently had 4 dog related pieces accepted to an Austin art show at Art for the People gallery called Celebrities – Pet & People Portraits. Future posts this week will provide more details about the show and the inspiration behind the pieces, but I wanted to share some creative custom framing ideas I used with 2 of the pieces in the show.
One of the troubling issues with framing is the commitment, secondarily the cost and complexity. The process of “properly” framing a painting often involves sealing it inside a frame in a way that makes getting it out an ordeal. When I hang finished art in my home, I can easily get bored of the frame after a year, or simply want to change the art that’s in the frame. To solve this problem, I came up with a Velcro based solution that works great with small pieces in floater frames, whereby you affix the piece with Velcro instead of glue or some other fixative, which allows you to swap out pieces in the same frame. This is handy for your personal art at home, gallery shows or events.
The steps to frame using Velcro, a process I’ve trademarked as “framecro“, are very simple, fast, and inexpensive. Let me know if you opt to framecro any of your paintings; improvements to the process are always welcome.
Most Velcro types will work, but the Command line of snap-type from 3M is what I prefer. They market it as a picture hanging velcro because it snaps together very tightly, but you can still pull it apart easily.
Cut 4 twin sets of velcro rectangles, which means you have 8 total rectangles of Velcro. These should be relatively small and easily fit into the 4 corners of the frame.
Affix the velcro to the corners of the frame and the corners of the back of the artwork.
Align the artwork and press it onto the frame.
You’re done! If you want to swap out a piece, just pop out the existing piece of art and press in a new one that has Velcro in it’s corners.
Snap style Velcro
Cut Velcro into matching pieces
Velcro attached to corner of floater frame and corner of artwork
Oftentimes 2 of 4 cornes is sufficient for small pieces
Sometimes art is very cathartic, but at times it can be maddening. However, I’ve learned over the years to rethink the frustration and consider those pull-my-hair-out-of-my-head moments as learning experiences, and more often than not it works. When I just can’t get a piece to work, either compositionally or from a technical skills perspective, if I focus on what I need to learn to fix it rather than become irritated at my shortcomings, I tend to get back that Zen painting zone.
Zip’s Flowers has been a long learning experience! Wars have taken less time to finish. That said, it’s chock full of newly acquired knowledge, of which I’m very excited about. There’s also some personal interest in terms of the background of this photo. This flower shop is a few blocks down the street from where I lived one summer in San Francisco. We lived in a great neighborhood along the border of the Mission and Castro districts, on 18th between Hartford and Noe. This flower shop, now called Urban Flowers, was along the way to the dog park. My wife would take the dogs at least once a day to the dog park. One day, the 1 year old puppy, Zip, decided smelling the flowers was no longer satisfying, so she opted to taste them. As the story goes, she reached out and grabbed a dangling flower from one of the pots and proceeded to knock the whole thing over! I wasn’t there, but my wife said the people at the shop were very friendly and weren’t concerned about Zip’s flower chomping. Of course I had to see this for myself, and a few days later I was walking Zip past this flower shop and sure enough, she tried to gobble down a basket of roses as we walked by.
The composition itself was probably the hardest hurdle to overcome, which I took license to adjust reality to make things work. The reference photo shows a wide variation of building colors and construction materials, so some adjustments had to be made on various fronts to make it look less contrived – ironically, the reality in the photo was too hard to believe in a painting. The values also had to be exaggerated to give depth and a sense of place, whereas the photo was very flat. Finally, the amount of tissue papered flowers was overwhelming and a bit distracting, so that was scaled back significantly.
My favorite part of this painting is the right foreground. First, the flowers in white paper came out much better than I had anticipated and they really frame that side of the painting. I also like the realism they add to the scene. Secondly, I’m very happy with the tall yellow sunflowers going up the stairs. These two elements combine to draw the viewer into the painting (hopefully) and consider wandering through the rest of the composition.
The sheer multitude of color is initially distracting for me, but once I stepped away from it for a day and returned to the completed piece, the colors were more welcoming and a source of excitement.
Do you like this piece? I’m guessing people either love it or hate it, given the colors and somewhat busy nature of the scene. Suggestions and observations are welcome.
As the saying goes, “It’s happy hour somewhere in the world”, but seeing as it’s 10am here in Austin, a post about cocktails is about all I can muster.
“Happy Hour – Angostura”
This is a small piece, oil on board, 5″x7″. This is the first in a series I’m going to do over the course of this year called “Happy Hour”. I’m always trying to think of ways to make art creative and engaging, which can be done in a number of ways. Instructors and workshops will often stress composition and technical prowess, which is very important, but I consider that table stakes. What’s often missing is intrigue, of which I’m plenty guilty of excluding in my works. To get the interest piqued with the Happy Hour series, I’m not going to reveal the specific cocktail in the name of the piece or initial blog post. The intrigue is for the viewer to figure it out based on bartender savvy hints.
Take this initial piece, “Angostura”, which is very simple in terms of composition. What do you consider valid and helpful hints in the painting? When putting this together, I wanted to provide 3 hints that a savvy bartender – professional or simply someone like me with a well stocked bar at home – would be able to use to identify the drink. In this case, those hints are some, but not all of the ingredients, color of the cocktail, and glassware. Can you figure it out?
If you want some help, PUNCH is a fantastic libation focused publication that is a notch above pretty much everything else out there, at least as far as I’ve been able to find. Once you crack the mystery of “Angostura” (hint: think simplicity… I’m not being clever with this one), dive into PUNCH and see what I mean about great cocktail insights.
Maybe 2020 should be the year of artistic intrigue?